Azure AD has many key strengths and features, automated user provisioning and single-sign-on (SSO) capabilities for a number of SaaS apps being two of them.

I’ve worked in consultancy focusing on identity, access and security the last five years - and I must honestly say that there’s nothing as cool as automating and controlling identity lifecycle and governance with modern and built-in capabilities like the ones Azure AD is offering.
Having users (and groups) automatically created, maintained and disabled/removed in connected SaaS apps gives organizations full control of the identities, while enabling single-sign-on for the same apps makes it painless for end-users to sign in, and lowers the volume of Service Desk tickets categorized as sign-in issues. Win-win!
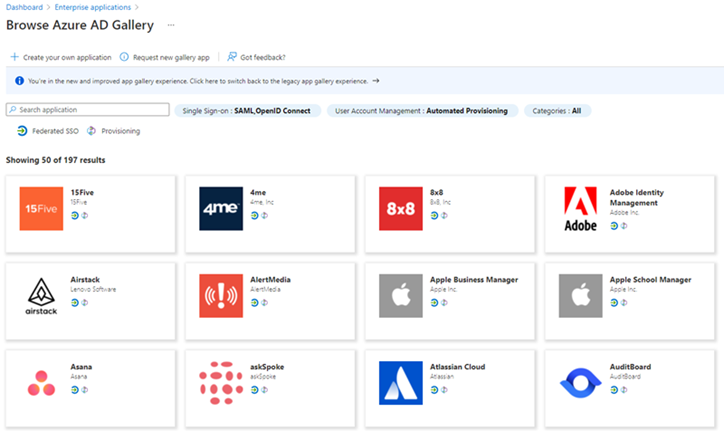
In the Enterprise Gallery you will, at the time of writing, find 230 SaaS apps supporting automated user provisioning (SCIM standard), and 1675 SaaS apps supporting SSO (SAML or OpenID Connect). Let’s take one of those SaaS apps, “Workplace from Facebook” which many organizations use today, and see how we can enable both of these features.
- Prerequisites
- Configuring single-sign-on
- Configuring automated user provisioning
- Testing and enabling automated user provisioning
Prerequisites
Note: As always, test well and get to know the features in a demo environment before planning for production!
You’ll need an Azure AD environment. I have a demo environment with Azure AD and M365 E5 licenses ready to go, but the Free Tier of Azure AD is sufficient for automated user provisioning to SaaS apps. Note that automated group provisioning requires Azure AD P1 licenses.
You need to be either a Global Administrator, Application Administrator or Cloud Application Administrator in the Azure AD tenant for adding the Workplace app and enabling the provisioning and SSO features.
Go to the Azure AD Gallery, search for “Workplace from Facebook” and create the app in Azure AD.
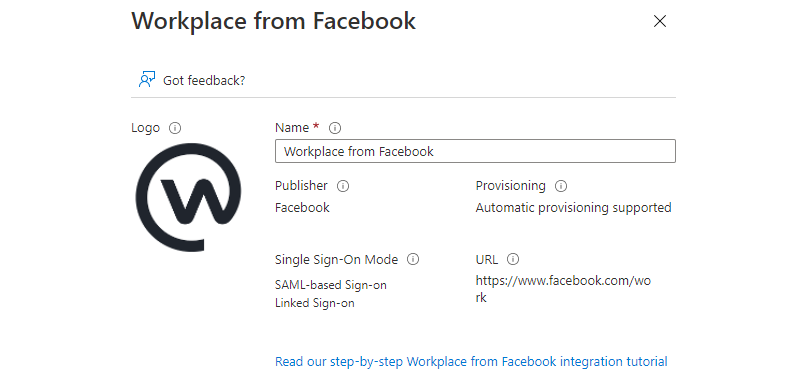
Signing up for a “Workplace from Facebook” trial grants 30 days of core capabilities, which is required both for automated user provisioning and for single-sign-on to Workplace. Be sure to sign up with a user where the email/UPN is for the same domain as in your Azure AD tenant, as this domain will have to be verified in Workplace before enabling SSO.
Once signed up with a trial, we can continue with enabling the features.
Configuring single-sign-on
Configuring single-sign-on in Azure AD for “Workplace from Facebook” is documented by Microsoft, but I’ll go through the steps here:
-
Navigate to the Azure Portal -> Enterprise Applications -> Workplace from Facebook (which you added earlier) -> Properties, set User assignment required to Yes and save.
Go to Users and groups and assign your admin account (the one you registered the Workplace environment with), as this account is needed for testing SSO before being allowed to save the SSO settings in Workplace.
-
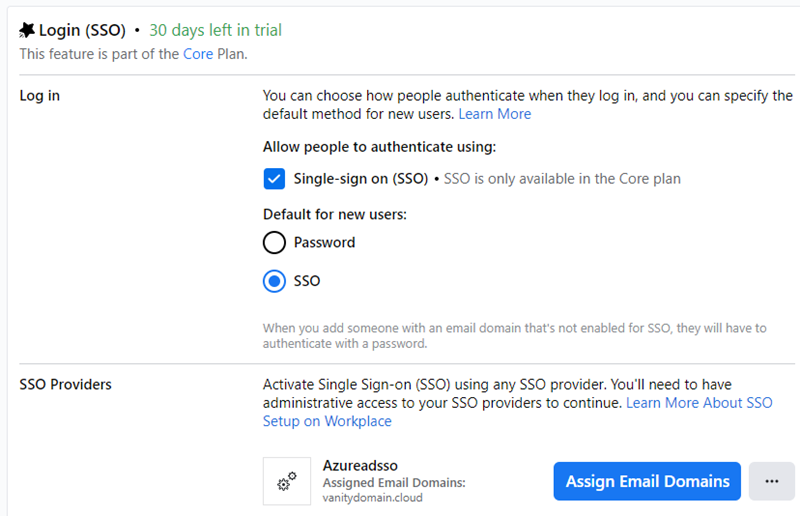
In a separate browser tab, navigate to the Workplace from Facebook website and log in to your new trial environment, then go to Admin Panel -> Security -> Authentication.
Activate the Single-sign on (SSO) option listed under Log in and set Default for new users to SSO.
Now click the + Add new SSO provider button and copy the following values to notepad:
Setting Example value Audience URL https://www.workplace.com/company/388226916265438 Recipient URL https://vanitydomaincloud394.workplace.com/work/saml.php ACS (Assertion Consumer Service) URL https://vanitydomaincloud394.workplace.com/work/saml.php Note: Do not use the example values above, make sure to fetch the correct values from your Workplace environment!
-
Go to the Azure Portal browser tab, navigate to Single sign-on in the Workplace from Facebook Enterprise App and select SAML
Click Edit on Basic SAML Configuration and paste in the values you copied to notepad in step 2:
Setting Value Identifier (Entity ID) Set value from: Audience URL Reply URL (Assertion Consumer Service URL) Set value from: ACS (Assertion Consumer Service) URL Sign on URL Set value from: Recipient URL Note: Set the new value in ‘Identifier (Entity ID)’ as default, and remove the ‘https://www.facebook.com/company/*’ value from the list before clicking Save!
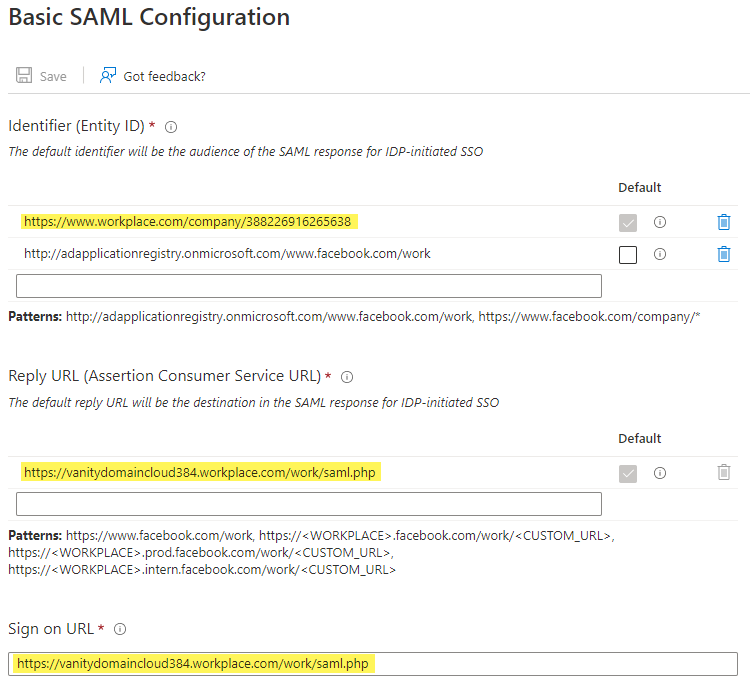
Then click Save and close the Basic SAML Configuration - choose No, I’ll test later if you’re asked to test single-sign-on
-
In the Azure Portal browser tab, under SAML Signing Certificate, click Download on Certificate (Base64), and open the downloaded Workplace from Facebook.cer file in notepad to view the base64 value.
Under Set up Workplace from Facebook on the same page, click the Configuration URLs dropdown and copy the following values to notepad:
Setting Example value Login URL https://login.microsoftonline.com/56aa0fa5-b7dd-4dbc-81da-3d57b2d69fff/saml2 Azure AD Identifier https://sts.windows.net/56aa0fa5-b7dd-4dbc-81da-3d57b2d69fff/ Logout URL https://login.microsoftonline.com/56aa0fa5-b7dd-4dbc-81da-3d57b2d69fff/saml2 Note: Do not use the example values above, make sure to fetch the correct values from your Azure AD app!
-
In the Workplace website browser tab, paste in the values you copied to notepad in step 4:
Setting Value Name of the SSO Provider Set value as: Azureadsso SAML Issuer URL Set value from: Azure AD Identifier SAML Certificate Set base64 value from: downloaded certificate 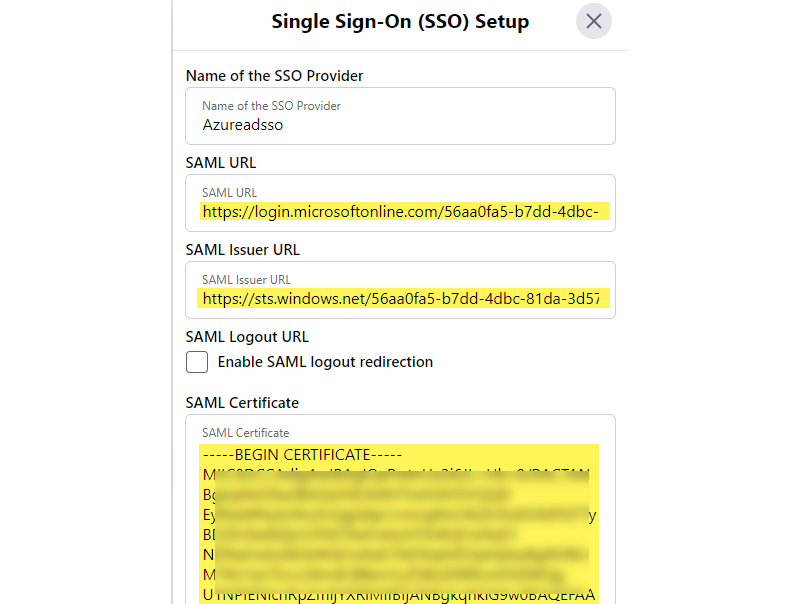
Once the values have been added, click the Test SSO button. If everything has been done correctly, you should see a new tab stating Your SSO is working properly

Now click Save Changes on the Single Sign-On (SSO) Setup dialog box in the Workplace website.
-
Still in the Workplace website browser tab, go to Admin Panel -> Settings -> Email Domains and follow the instructions to verify the email domain.
Once verified, go back to Admin Panel -> Security -> Authentication, click the Assign Email Domains button and add your verified domain - click Save. Also verify that Allow people to authenticate using is set to Single-sign on (SSO) and Default for new users is set to SSO
Note: Remember to click Save Changes on the Authentication page once everything is configured.
This concludes the setup of single-sign-on. Any Azure AD users assigned to the Workplace from Facebook app, which also exists as a user in Workplace, will now be able to use single-sign-on.
Configuring automated user provisioning
Configuring automated user provisioning in Azure AD for “Workplace from Facebook” is documented by Microsoft, but I’ll also go through the steps here:
-
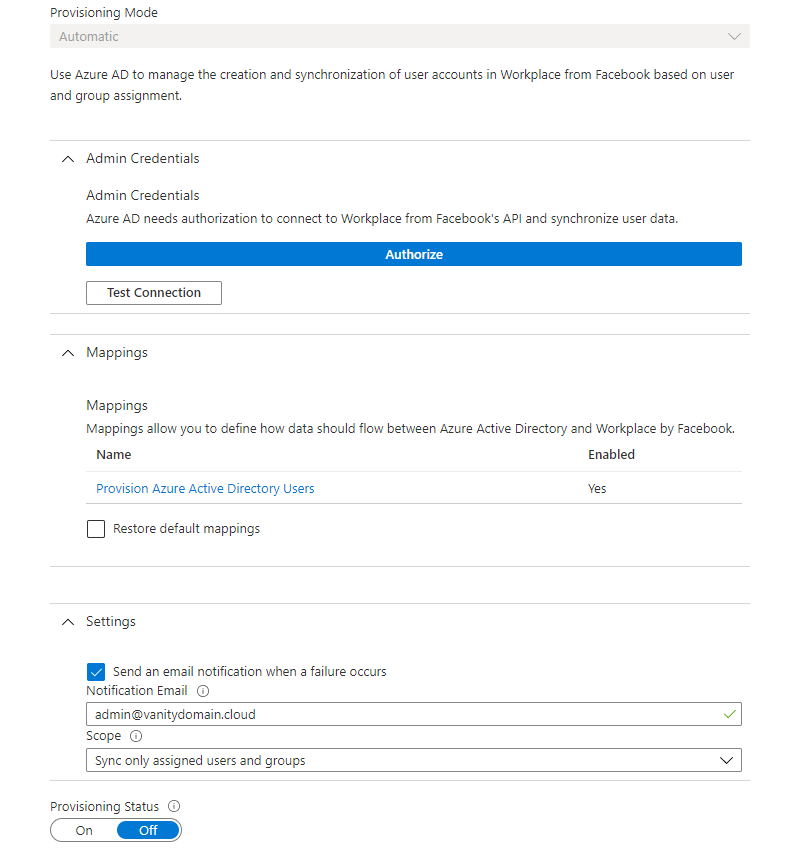
Navigate to the Azure Portal -> Enterprise Applications -> Workplace from Facebook -> Provisioning, click Get started and set Provisioning Mode to Automatic.
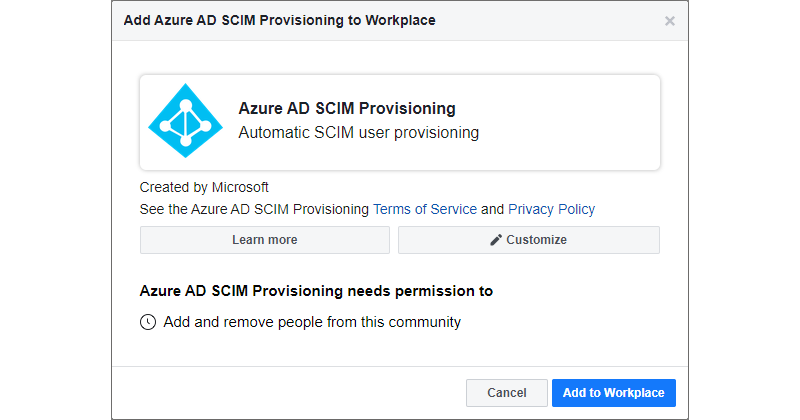
Then click the Admin Credentials dropdown, click Authorize and authenticate with your Workplace administrator account. Then proceed with authorizing Azure AD SCIM Provisioning to create, manage and disable users in Workplace by clicking Add to Workplace.
-
Back in the Azure Portal, proceed by clicking the Mappings dropdown. Since the Workplace from Facebook gallery app comes with a default set of attributes mapping, there is no need to change this configuration. However, if you need to synchronize additional attributes then this is the place to do those changes.
-
Now click the Settings dropdown and configure email notification, Azure AD will email the configured email address if a synchronization failure occurs.
-
Click Save at the top of the page to save the configuration, then refresh the page to reveal all the configuration options. To get back to the configuration page, click Edit provisioning on the Provisioning page on the Workplace from Facebook app. You will see that the settings are saved, but that Provisioning Status is Off - meaning that the synchronization job has not yet been activated.
The configuration of automated user provisioning is completed. But prior to activating the synchronization job it is important to test and verify that user provisioning is working correctly.
Testing and enabling automated user provisioning
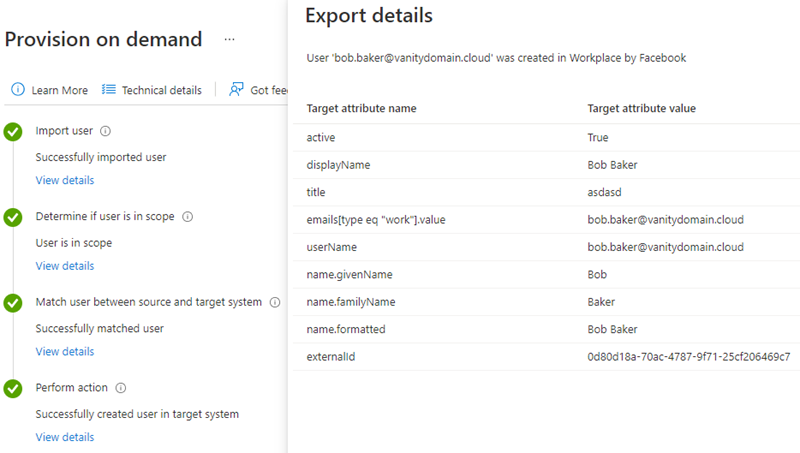
Use the Provision on demand feature in Azure AD to test user provisioning, this feature enables you to synchronize one user at a time to verify that the SCIM operation, object matching and attribute flow works as expected. This is a good exercise to get confident with the provisioning process.
To provision on demand, navigate to the Azure Portal -> Enterprise Applications -> Workplace from Facebook -> Provisioning -> Provision on demand. Type in the UserPrincipalName of a user already assigned to the app, and click Provision.
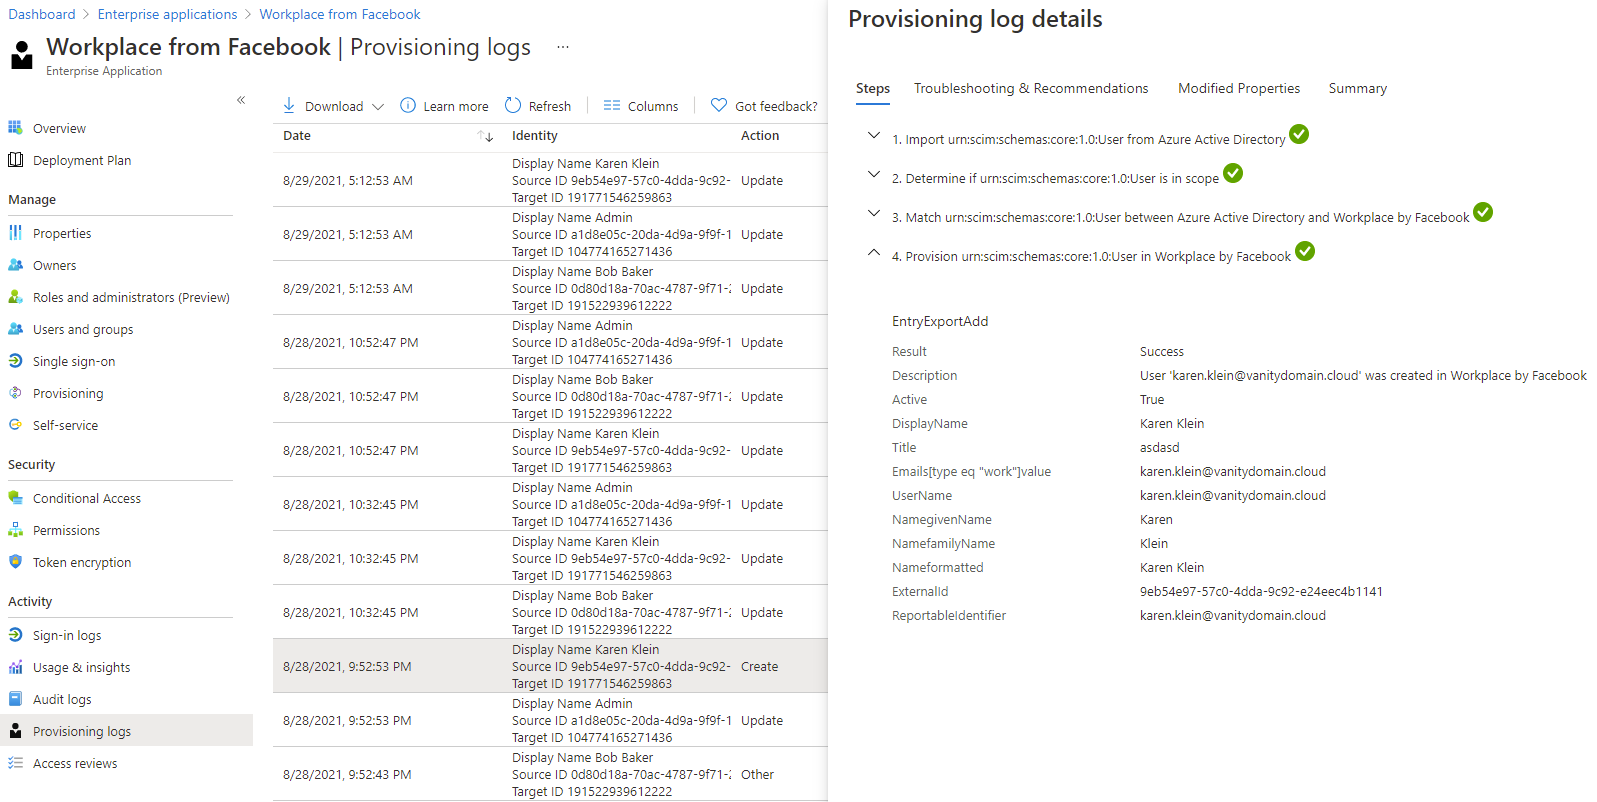
Note: If the user already exists in Workplace you will see an Update operation, if the user does not exist you will se a Create operation. Note that users disabled in Azure AD will not be provisioned to any target systems through Azure AD App Provisioning, as being enabled is a requirement. Also, since the app was configured to require user assignment, only users assigned to the app will be provisioned to Workplace. Lastly, Azure AD will never delete users in Workplace, as Workplace does not allow it by default. Azure AD will only disable the account (soft-delete) in Workplace when the account is disabled in Azure AD.
Once you have provisioned a few users on demand and are satisfied with the results, make sure to enable the automated synchronization job by clicking Start provisioning. Azure AD will from now on automatically create, update and disable assigned users in Workplace. An initial full synchronization cycle will run first, whereafter a delta synchronization will run every 40 minutes indefinitely.
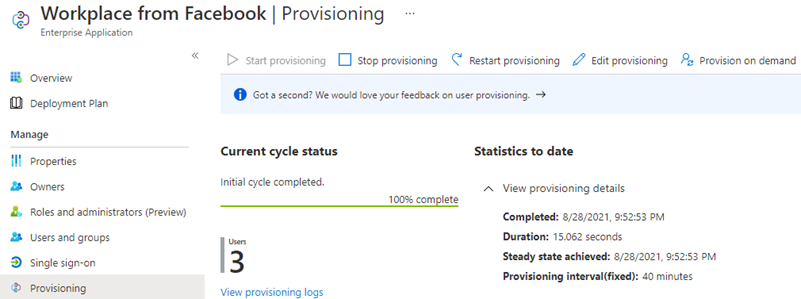
Keep an eye on the Provisioning logs for the app to gain visibility into the operations carried out by Azure AD App Provisioning service, including any errors, created/updated objects and modified properties. The Audit log for the app will also contain valuable information both for troubleshooting and for visibility into the service.
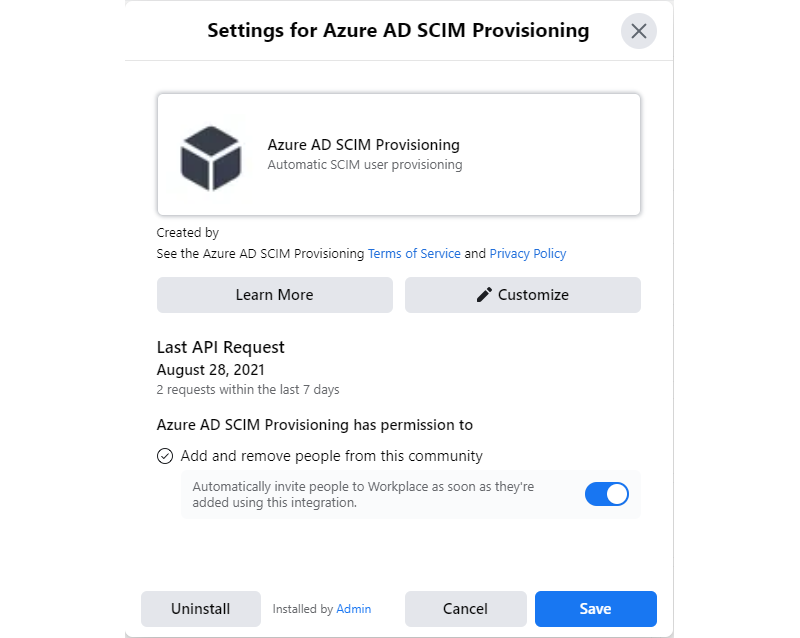
Tip: If you need Workplace to automatically invite a new user created by Azure AD, instead of requiring an admin to click the Invite button on their user profile which is the default setting, go to Workplace -> Admin Panel -> Integrations, edit Azure AD SCIM Provisioning and enable Automatically invite people to Workplace as soon as they’re added using this integration
And that concludes this blog post, thanks for reading!