Custom Extensions really brings a new flavor to Entitlement Management. Let’s first look at what it is.
What is Entitlement Management?
Entitlement Management (ELM) is an Identity Governance feature in Azure AD that can manage identity and access lifecycle in an organization with the use of automated workflows for requests, approvals, assignments, reviews and expiration of access permissions.
Basically, you create an access catalog and add resources like Azure AD security groups, Microsoft 365 groups, SharePoint sites and applications to it - before creating one or more access packages with assigned roles to one or more of those resources including role scope (e.g. member or owner on a group). Then you add an assignment policy controlling who can request access, who can approve access requests, who must do an access review at given intervals, and specify access expiration if required. Once a user request access to the access package, and the request is approved, the access role is granted to the user for all assigned resource role scopes.
It’s also a great way of doing lifecycle management on B2B users - if a guest joins your Azure AD tenant by signing up through an access package in ELM, once the access package has expired and the guest has no other access packages assigned, ELM can automatically block and/or delete the guest user.
What is Custom Extensions in ELM?
The latest addition in ELM is a feature named Custom Extensions. With this feature you can trigger a Logic App in Azure when certain activities occur within an access package, like someone requesting or approving access, when access is activated or removed, or when expiration is near. Custom Extensions and Logic Apps really brings something new to the table, the automation possibilities are huge: send an email when someone is granted an access package, send a REST call to an API when someone is removed from an access package, trigger another Logic App or even a Function App etc.
The Custom Extensions feature is currently in public preview.
Show me how to set it up!
I’ll walk you through the setup of an access package catalog with Custom Extensions. In this scenario we will trigger a Logic App which posts a message to a specific Teams channel every time an access package assignment or removal is completed. This is just a simple scenario to get you started!
Note: Microsoft is working on adding Custom Extensions endpoint to the Graph beta API, so until further notice this can only be configured through the Azure portal.
In this scenario you will need a tenant with an Office 365 license for Teams, Azure AD P2 license for ELM and an Azure subscription with Contributor access for the Logic App.
Prerequisites
-
First create a new Azure AD security group to use with the access package assignment. Go to the Azure AD Portal -> Azure Active Directory -> Groups and create it with Membership type set to
Assigned. -
Then create a resource group in Azure where the Logic App will be provisioned. Go to the Azure Portal -> Create Resource Group, choose the correct subscription and region, specify a unique name for the resource group and click Review + create -> Create.
-
Now create a new access package catalog. Go to the Azure AD Portal -> Azure Active Directory -> Identity Governance -> Catalogs.
- Click New Catalog and give it a name and description, set Enabled for external users to
Noif you only want member users in the tenant to be able to request access packages in this catalog. Click Create.
- Click New Catalog and give it a name and description, set Enabled for external users to
-
Now open the new access package catalog and go to Resources, click Add resources, click + Groups and Teams and add the Azure AD security group that was created in step 1.
Note: A resource, like a group, must be added to the catalog prior to adding it to an access package in that catalog.
-
Still in the access package catalog, click Custom Extensions (Preview) -> Add a custom extension to set up the integration with Logic Apps. Give it a name and description.
-
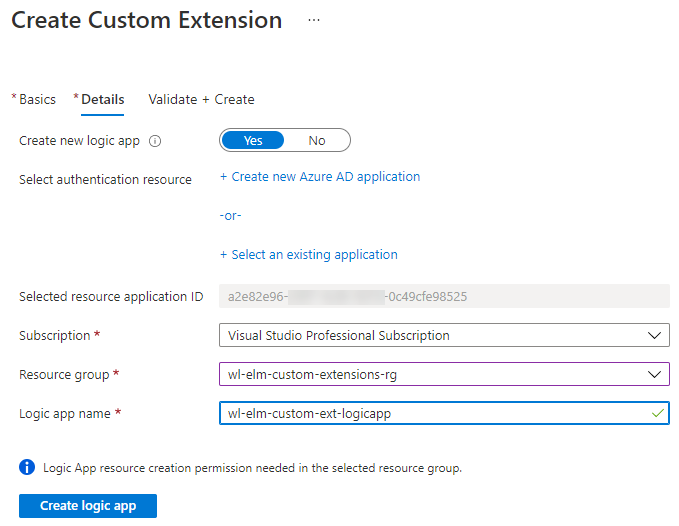
Click Next: Details and set Create a new logic app to
Yes. Click + Create new Azure AD Application to create an app in Azure AD which is required for the integration. Give it a name and keep all other options as default, click Register. -
Now specify the correct subscription, resource group that was created in step 2, and set a unique name for the Logic App. When satisfied, click Create logic app.
-
Once the Logic App is created successfully, click Validate + Create, then Create.
-
-
Go back to Identity Governance, then click Access packages -> New access package. Give it a name and description and choose the new catalog that was created in step 3.
-
Click Next: Resource roles and click + Groups and Teams, choose the Azure AD security group that was added to the catalog in step 3. Set the Role to
Member. -
Click Next: Requests and scope who can request this access package. If you only want member users in your tenant to be able to request it, activate For users in your directory, then choose All members (excluding guests). Also scope approvals if you need to, if you don’t require approvals all members can request and be assigned the access package automatically. Be sure to enable the access package by clicking Enable new requests.
-
Click Next: Requestor Information, then Next: Lifecycle and specify expiration and access reviews settings.
-
Click Next: Rules. Here you will specify when the connected Logic App will trigger. You can specify more than one trigger, and the following triggers are available:
- Request is created
- Request is approved
- Assignment is granted
- Assignment is about to expire in 14 days
- Assignment is about to expire in 1 day
- Assignment is removed
In this example I’m adding
Assignment is grantedandAssignment is removedtriggers and setting the Custom Extension to the Logic App created in step 5. This will make sure that the Logic App is triggered whenever a user is added or removed from the access package.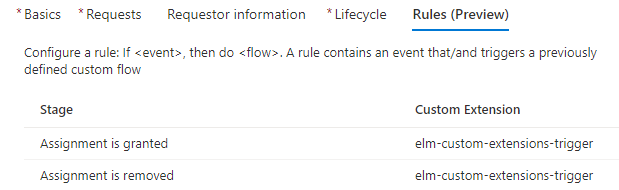
Note: At the time of writing, specifying Logic App triggers during creation of an access package does not seem to work. Instead, create the access package without any rules, then re-open the created access package, go to Policies -> Initial Policy -> Edit, then go to the Rules tab and set up the triggers.
-
All right, the prerequisites are in place, now let’s jump over to the next part.
Create Teams Webhook
Since we want the triggered Logic App to post a message to Teams we need to set up a Webhook connector.
-
In Teams, go to the Team and channel you want the messages posted to. Click the 3 dots (…) next to the channel name, click Connectors.
-
Search for
Incoming Webhookand click Add. Give it a name and create it, note down the URL for the webhook. Note that this value is sensitive.
Now let’s edit the Logic App and set up the actions.
Edit the Logic App
The Logic App that was automatically created via the access package catalog does not contain many actions by default, so we need to edit it in order to make it do what we want it to do.
-
Go to the Azure Portal and find the resource group you created in step 2 in the prerequisites. Click on the Logic App.
-
Go to Logic app designer, this is the graphical overview of the triggers and actions for the Logic App. As you can see it only contains 1 trigger (When a HTTP request is received) and a condition.
-
Below the existing condition, click + New step to set up a new action.
-
Search for and choose
HTTP. -
In
Method, choose POST. -
In
URI, paste in theWebhook URLfrom the last chapter.Warning: The URL is all it takes to now post a message to Teams where the Webhook was set up, so it would be wise to regard the URL as sensitive and add it as a secret to a keyvault, and make the Logic App fetch it securely instead.
-
In
Body, add a JSON object with the values you want to be posted to Teams. In this example I use a MessageCard - there are several ways to configure the look and feel of the posted message.{ "@@context": "<http://schema.org/extensions>", "@@type": "MessageCard", "sections": [ { "activitySubtitle": "Catalog: @{triggerBody()?['CatalogName']}", "activityText": "Event: @{triggerBody()?['Event']}", "activityTitle": "User: @{triggerBody()?['TargetEmail']}" } ], "text": "Assignment change detected for access package: @{triggerBody()?['AccessPackageName']}", "title": "ELM Custom Extensions" }This JSON takes input values from the ELM trigger (triggerBody) and posts it to the Teams webhook. Note that
@characters in JSON within Logic Apps must be prefixed with another@to work.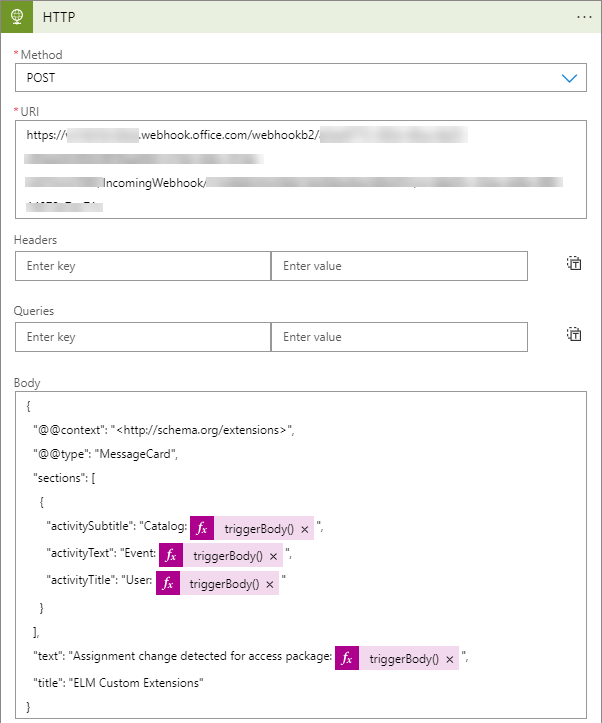
-
Click Save in the Logic App to activate the change.
-
Now that we have added a new action to the Logic App, let’s test it out!
Add an access package assignment
In order to trigger the Logic App, we need to assign a user to the access package.
-
Go to the Azure AD Portal -> Azure Active Directory -> Identity Governance -> Access Packages
-
Open the access package created earlier and click Assignments -> New assignment.
-
Select policy
Initial Policy -
Select
Users already in my directoryand click Add users, search for a user to assign the access package to. You can bypass the approval step. -
Click Add, this will immediately assign the user to the access package.
-
Now you can go and look in the Azure AD Portal to verify that the user was added to the security group created earlier - it can take a few minutes before the membership is updated. The user will be a member of this group as long as the access package is assigned to the user, and the group is assigned as a resource in the access package.
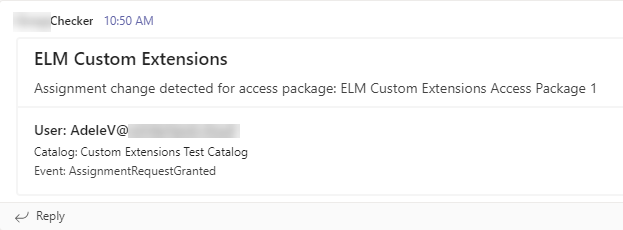
Then go to the Teams channel where the Webhook was created, verify that the message was posted.
If you go back to the Logic App and view Run history in the Overview tab, you will see all the runs triggered by ELM. Click on a run to view its history details. Click on the When a HTTP request is received trigger, then click Show raw outputs to view the contents of the JSON payload sent by ELM to the Logic App - these are the values which you can use to automate stuff with the Logic App.
{
    "headers": {
        "Connection": "Keep-Alive",
        "Authorization": "*sanitized*",
        "Expect": "100-continue",
        "Host": "prod-xx.norwayeast.logic.azure.com",
        "x-ms-client-request-id": "1a873c0c-xxxx-xxxx-xxxx-3805a0f3e8b3",
        "client-request-id": "1a873c0c-xxxx-xxxx-xxxx-3805a0f3e8b3",
        "x-ms-correlation-request-id": "1a873c0c-xxxx-xxxx-xxxx-3805a0f3e8b3",
        "Content-Length": "725",
        "Content-Type": "application/json; charset=utf-8"
    },
    "body": {
        "AccessPackageId": "23fc5a9c-xxxx-xxxx-xxxx-51328d277b99",
        "AccessPackageAssignmentRequestId": "2409f9d5-xxxx-xxxx-xxxx-7f89378c2d73",
        "AccessPackageAssignmentId": "e48f189b-xxxx-xxxx-xxxx-1ff049a18808",
        "AccessPackageName": "ELM CUstom Extensions Access Package 1",
        "AccessPackagePolicyName": "Initial Policy",
        "AccessPackagePolicyId": "1298a1e9-xxxx-xxxx-xxxx-8488097952c3",
        "CatalogId": "98bb616a-xxxx-xxxx-xxxx-1fa7af90ee35",
        "CatalogName": "Custom Extensions Test Catalog",
        "ConnectedOrganizationName": null,
        "Event": "AssignmentRequestGranted",
        "RequestCreatedDateTime": "2021-11-04T09:24:05.037+00:00",
        "TargetEmail": "[email protected]",
        "TargetId": "b8b38217-xxxx-xxxx-xxxx-0bbeb60396b7",
        "TargetDisplayName": "Adele V."
    }
}
Notice the Event value in the JSON payload. The following events will be posted to the Logic App if created as a rule in the access package:
| Stage | Event value | Description |
|---|---|---|
| Request is created | AssignmentRequestCreated | Request is created |
| Request is approved | AssignmentRequestApproved | Request is approved |
| Request is granted | AssignmentRequestGranted | Access package is assigned |
| Assignment is about to expire in 14 days | AssignmentNear14daysExpiration | Access package assignment expires in 14 days |
| Assignment is about to expire in 1 day | AssignmentNear1dayExpiration | Access package assignment expires in 1 day |
| Assignment is removed | AssignmentRemoved | Access package is unassigned |
This was just a very simple scenario to get you started, but the automation possibilities here are nearly endless. Kudos to Microsoft for adding this capability to ELM.
And that concludes this blog post, thanks for reading!