Forget about POP3, IMAP, Exchange Web Services (EWS) and other legacy protocols for accessing mailbox resources programmatically. These protocols are being deprecated by Microsoft, and rightly so. See my blog post on blocking legacy authentication for more details.
The modern way of connecting programmatically is via Microsoft Graph. By assigning Graph permission scopes to workload identities, you can grant access like send email, read and/or write email, calendar, contacts etc. However, assigning these permission scopes means that the workload identity receives permissions to all mailbox resources in the organization, which is far from least-privilege.
To circumvent this and scope permissions down to one or a few specific mailboxes, set up an application access policy in Exchange Online. The supported Graph permission scopes for this policy is:
Mail.ReadMail.ReadBasicMail.ReadBasic.AllMail.ReadWriteMail.SendMailboxSettings.ReadMailboxSettings.ReadWriteCalendars.ReadCalendars.ReadWriteContacts.ReadContacts.ReadWrite
Let’s look at how to set this up.
- The scenario
- Create a Logic App and grant Graph application scope
- Create a shared mailbox and a mail-enabled security group
- Create the application access policy in Exchange Online
- Configure the Logic App to send mail
The scenario
To showcase this policy, we will create a scheduled Logic App which will send mail via Microsoft Graph. The Logic App authenticates to Graph using a managed identity. The policy will allow the Logic App to send mail from a specific shared mailbox, but not from other mailboxes in the organization.
We will need the following resources:
- A shared mailbox which the Logic App will send mail from.
- A mail-enabled security group. This group will contain mailbox objects that the policy will scope down access to.
- A Logic App with a system assigned managed identity.
Create a Logic App and grant Graph application scope
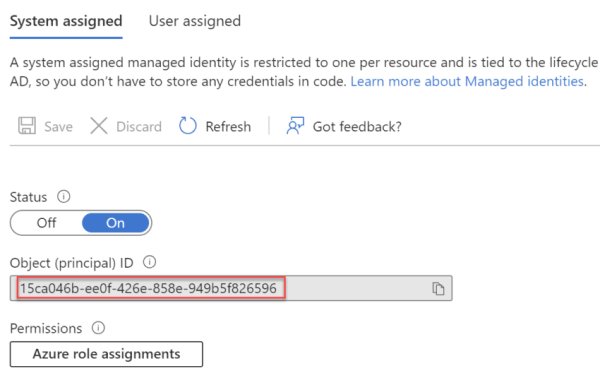
Create a consumption-based Logic App with a HTTP or recurrence trigger, enable system assigned managed identity from the Identity blade. Make a note of the Object (principal) ID as we will need it for later.
Once the managed identity has been created, we need to grant it the Send.Mail application scope in Microsoft Graph in order to allow it to send mail via Graph. This can be completed using the Microsoft Graph Powershell SDK, or by using the AzureAD Powershell module.
Note: As already mentioned, granting Send.Mail application scope to a workload identity allows it to send mail as anyone in the organization, which is why it is important to scope down the access with an Exchange Online policy. This is also true for any other mailbox application scope permissions in Graph.
In the script below, make sure to add the correct Object (principal) ID as noted down earlier for the managed identity.
Granting Mail.Send application scope with Microsoft Graph Powershell SDK:
# Add the correct 'Object (principal) ID' for the Managed Identity
$servicePrincipalObjectId  = "15ca046b-ee0f-426e-858e-949b5f826596"

# Add the correct Graph scope to grant
$graphScope = "Mail.Send"

Connect-MgGraph -Scope AppRoleAssignment.ReadWrite.All
$graph = Get-MgServicePrincipal -Filter "AppId eq '00000003-0000-0000-c000-000000000000'"
$graphAppRole = $graph.AppRoles | ? Value -eq $graphScope

$appRoleAssignment = @{
    "principalId" = $servicePrincipalObjectId
    "resourceId"  = $graph.Id
    "appRoleId"   = $graphAppRole.Id
}

New-MgServicePrincipalAppRoleAssignment -ServicePrincipalId $servicePrincipalObjectId -BodyParameter $appRoleAssignment | Format-List
If you want to use the AzureAD Powershell Module instead:
# Add the correct 'Object (principal) ID' for the Managed Identity
$servicePrincipalObjectId  = "15ca046b-ee0f-426e-858e-949b5f826596"

# Add the correct Graph scope to grant
$graphScope = "Mail.Send"

Connect-AzureAD
$graph = Get-AzureADServicePrincipal -Filter "AppId eq '00000003-0000-0000-c000-000000000000'"
$graphAppRole = $graph.AppRoles | ? Value -eq $graphScope
New-AzureADServiceAppRoleAssignment -Id $graphAppRole.Id -PrincipalId $servicePrincipalObjectId -ResourceId $graph.ObjectId -ObjectID $servicePrincipalObjectId
Create a shared mailbox and a mail-enabled security group
Using Azure Cloud Shell, it’s easy and quick to connect to Azure and Exchange Online with Powershell. The following Powershell code will create a shared mailbox, a mail-enabled security group, and add the shared mailbox as a member in the mail-enabled security group. The group is required when creating the Exchange Online policy later.
Edit the configuration in the script to set correct names and email addresses for the objects.
# Mailbox and group configuration
$sharedMailboxName = "Logic App Notifications"
$sharedMailboxEmail = "[email protected]"
$mailSecurityGroupName = "DL Graph Scope Group WL Mailsender LogicApp"
$mailSecurityGroupEmail = "[email protected]"

# Connect to EXO
Connect-ExchangeOnline

# Create shared mailbox
$sharedMailboxObject = New-Mailbox -Shared -Name $sharedMailboxName -DisplayName $sharedMailboxName -Alias ($sharedMailboxName.Replace(' ','')) -PrimarySmtpAddress $sharedMailboxEmail

# Create mail-enabled security group
$mailSecurityGroupObject = New-DistributionGroup -Name $mailSecurityGroupName -Alias ($mailSecurityGroupName.Replace(' ','')) -Type Security -PrimarySmtpAddress $mailSecurityGroupEmail

# Add the shared mailbox as member of the group
Add-DistributionGroupMember -Identity $mailSecurityGroupObject.Identity -Member $sharedMailboxObject.Identity

# Output to console
$sharedMailboxObject | Select-Object -Property ExternalDirectoryObjectId
$mailSecurityGroupObject | Select-Object -Property PrimarySmtpAddress
Make a note of the ExternalDirectoryObjectId of the shared mailbox, and the PrimarySmtpAddress for the mail-enabled security group as we need those values for later. ExternalDirectoryObjectId of the shared mailbox is needed in the Logic App when sending mail via Graph, and PrimarySmtpAddress for the mail-enabled security group is needed when creating the policy in Exchange Online.
Create the application access policy in Exchange Online
The following Powershell code will create a new application access policy in Exchange Online. The policy will be scoped to the mail-enabled security group created earlier, and targeted to the Logic App’s managed identity.
Note: It is the actual app id of the service principal, and not the object (Principal) id which must be targeted for the policy to work. This is why the Powershell code looks up the service principal object.
In the script below, make sure to add the correct Object (principal) ID as noted down earlier for the managed identity. It requires an Exchange Online Powershell session, use Azure Cloud Shell for easy access.
# Policy configuration
$servicePrincipalObjectId = "15ca046b-ee0f-426e-858e-949b5f826596"
$mailSecurityGroupAddress =  "[email protected]"
$policyDescription = "Restrict this app's permissions to members of distribution group $($mailSecurityGroupAddress)"

# Fetch Service Principal object
$servicePrincipalObject = Get-AzADServicePrincipal -ObjectId $servicePrincipalObjectId
New-ApplicationAccessPolicy -AppId $servicePrincipalObject.AppId -PolicyScopeGroupId $mailSecurityGroupAddress -AccessRight RestrictAccess -Description $policyDescription
Everything is now set up in Exchange Online. According to this article on Microsoft Docs it can take more than one hour for the policy to become effective. While waiting you can run the following Powershell code to test the policy to see that it should work according to plan, AppId is the managed identity’s app id, and Identity is the mail address for a mailbox which is in the scoped mail-enabled security group created earlier.
Test-ApplicationAccessPolicy -Identity "[email protected]" -AppId $servicePrincipalObject.AppId
In the output, AccessCheckResult should be Granted.
If you now change Identity to a mailbox which is not in the scoped mail-enabled security group, the output for AccessCheckResult should be Denied. As expected, the policy only grants access to the managed identity for the shared mailbox already in the scoped mail-enabled security group, and not for some other mailbox in the organization.
Configure the Logic App to send mail
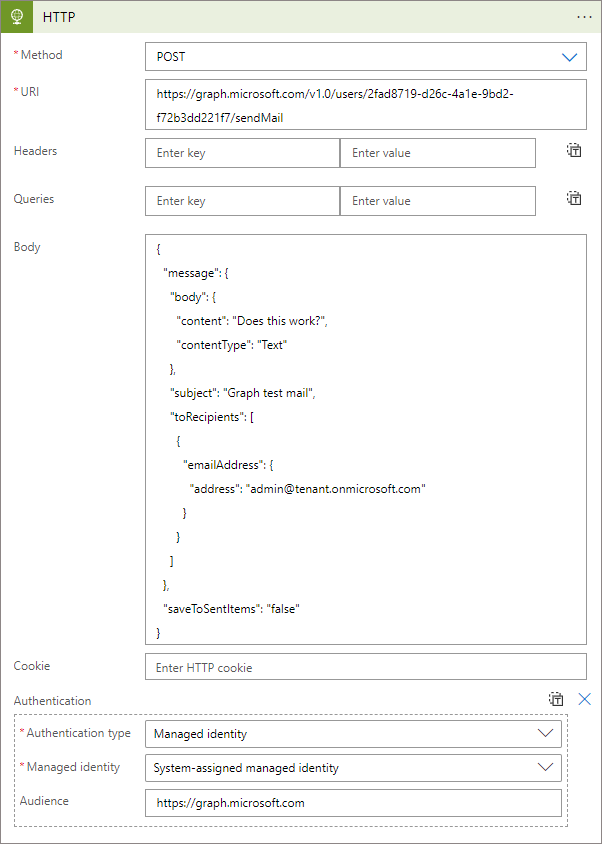
After you have waited a few hours for the Exchange Online policy to start working, go to the Logic App designer and create a new action workflow step:
- Operation:
HTTP - Method:
POST - URI:
https://graph.microsoft.com/v1.0/users/<shared mailbox object id>/sendMail - Add new parameter:
Authentication - Authentication type:
Managed identity - Managed identity:
System-assigned managed identity - Audience:
https://graph.microsoft.com
Set the correct shared mailbox ObjectId, as noted down earlier, in the URI address. This is the mailbox that mail via Graph will be sent from.
Then add the following contents to Body, make sure to set the correct recipient address etc:
{
  "message": {
    "subject": "Graph test mail",
    "body": {
      "contentType": "Text",
      "content": "Does this work?"
    },
    "toRecipients": [
      {
        "emailAddress": {
          "address": "[email protected]"
        }
      }
    ]
  },
  "saveToSentItems": "false"
}
It should look like this:
Save the Logic App and run it. The expected result from the HTTP action workflow step should be status code 202 Accepted. This means that the operation was allowed and the mail should be received in the mailbox of the user it was sent to.
Now, by changing the ObjectID in the URI to an id for a mailbox user which is not a member of the mail-enabled security group scoped in the Exchange Online policy, saving and running the Logic App again, the expected result from the HTTP action workflow step should be status code 403 Forbidden.
{
  "error": {
    "code": "ErrorAccessDenied",
    "message": "Access to OData is disabled."
  }
}
This means the Exchange Online policy works, as it only allows the managed identity to send mail via Graph as a mailbox which is a member of the scoped mail-enabled security group.
Now you know how to scope Graph mailbox permissions for workload identities down to specific mailboxes, thanks for reading!