Whenever an Azure resource needs to authenticate to Azure AD, an identity needs to be provided to the Azure resource. Historically, this process involved creating an App registration with a Service Principal, and adding app credential as a client secret (password string) or a certificate. Then providing the app credential to the Azure resource so that it can use the credential to retrieve Azure AD access tokens, while granting the Service Principal with Azure RBAC roles or Azure AD permissions, depending on the scenario.
This way of doing Azure AD authentication within the tenant is rather old-school and leads to some issues, risk and management overhead:
- App credentials (client secrets and certificates) has a limited lifetime and requires to be rolled from time to time. Microsoft recommends an expiration date of less than 12 months for client secrets.
- If an App credential expires, it can lead to downtime for the services utilizing the credential.
- App credentials, and especially client secrets, are often at risk for ending up as clear-text in code which can lead to compromise.
Managed Identities, formerly known as Managed Service Identity (MSI), solves these issues and is the recommended way of doing Azure AD authentication for Azure resources within the same tenant.

Blog post contents:
- What is Managed Identities?
- Enable Managed Identity for an Azure resource
- Grant permissions for Managed Identities
- Query Microsoft Graph with a Managed Identity in a Logic App
What is Managed Identities?
Managed Identities is a way of providing identities to Azure resources without any App credentials like certificates or client secrets involved. Microsoft automatically manages App credentials for Managed Identities behind the scenes and completely removes the management overhead and risk. The App credentials of Managed Identities is not even accessible, and they don’t need to be as the Azure resource configured with a Managed Identity is instead allowed to retrieve Azure AD access tokens directly using the assigned Managed Identity. Managed Identities can be used by a long list of Azure resources to authenticate to any resource that supports Azure AD authentication. And - it’s free!
Some examples:
- Azure Virtual Machine configured with Managed Identity granted access to a read data in a Storage Account.
- Web App configured with Managed Identity granted access to retrieve secrets dynamically from a Key Vault to application settings environment.
- Logic App configured with Managed Identity granted access to read, create, patch and delete Azure AD resources via Microsoft Graph.
There are two types of Managed Identities:
System assigned: This is a Managed Identity enabled directly on a specific Azure resource, like an Azure Virtual Machine or a Logic App. Once an Azure resource is enabled with a system-assigned Managed Identity, a Service Principal identity object is created in Azure AD which will follow the lifecycle of that Azure resource - meaning that if the Azure resource which enabled the Managed Identity is deleted, the identity object is also deleted. A system-assigned Managed Identity can only be used by the specific Azure resource it is enabled for.User assigned: This is a Managed Identity created as a standalone Azure resource within a resource group, which can then be assigned to one or more Azure resources, like an Azure Virtual Machine and a Logic App. This also creates a Service Principal identity object in Azure AD which will follow the lifecycle of that specific Managed Identity resource, and not the lifecycle of any Azure resources the Managed Identity is assigned to.
Note: Since user assigned Managed Identities can be assigned to and used by multiple Azure resources, it is important to understand that anyone with contributor access to a specific Managed Identity resource can assign it to their own Azure resources - effectively gaining the same access to resources as the Managed Identity has been granted.
Enable Managed Identity for an Azure resource
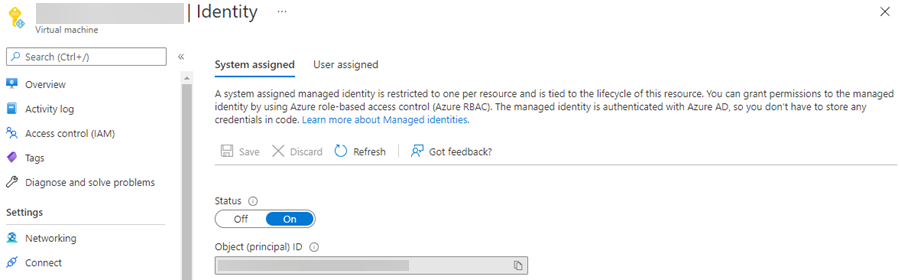
In the Azure Portal, go to the resource you want to enable a Managed Identity for and visit the Identity blade. If you want to utilize a System assigned Managed Identity, simply set Status to Onand save. This will create and assign a Managed Identity on the resource, and the Service Principal identity object is automatically created in Azure AD.
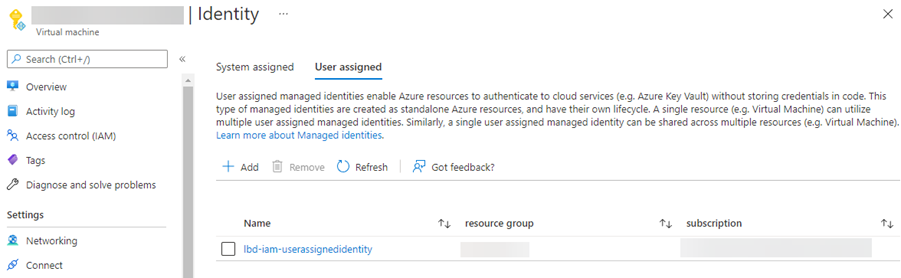
If you want to utilize a User assigned Managed Identity instead, for an example because you want to use the same Managed Identity for several Azure resources, you first have to create a Managed Identity resource. Go to the resource group, click + Create, search for User Assigned Managed Identity and go through the creation process. Once the resource has been created, go back to the Azure resource where you want to assign the Managed Identity, and visit the Identity blade, then click the User assigned tab and click + Add. All User assigned Managed Identities you have contributor access to will be listed, choose the correct Managed Identity and click Add.
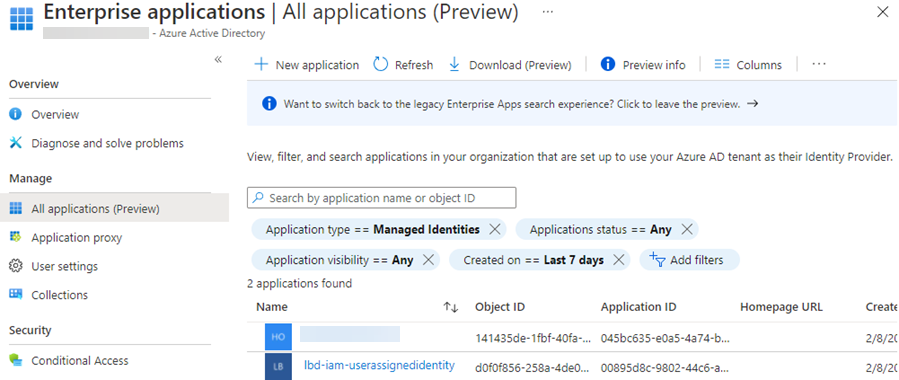
In Azure AD, we can now see that the Service Principal identity objects (Application Type = Managed Identities) have been created.
Managed Identities can of course be managed using Azure CLI, Terraform, ARM and Bicep too.
Grant permissions for Managed Identities
Managed Identities can be granted Azure RBAC roles, Microsoft Graph permission scopes etc, and the Azure resource(s) assigned a Managed Identity will then be able to retrieve Azure AD access tokens and access resources with permissions granted to the Managed Identity.
Grant RBAC roles
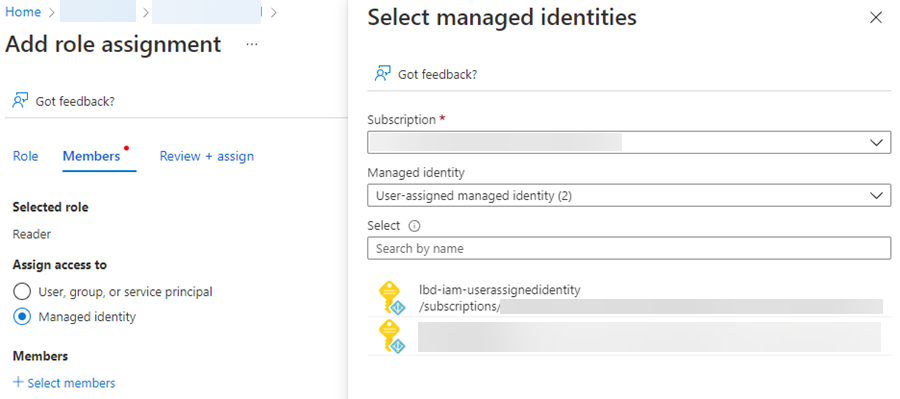
To grant an Azure RBAC role to a Managed Identity, go to the Azure Portal and visit the resource you want to grant RBAC role for, click the Access control (IAM) blade, Role assignments tab and click + Add -> Add role assignment. Select the correct RBAC role, click Next, set Assign access to to Managed identity and select the correct System assigned or User assigned Managed Identity, and assign the RBAC role.
Grant Microsoft Graph scopes
There is currently no way to grant Microsoft Graph permission scopes to a Managed Identity in the Azure AD Portal GUI, but you can use the Azure AD Powershell module.
In this example we’re adding User.Read.All application scope, so that the Managed Identity will be allowed to query Microsoft Graph for all Azure AD users. You can use Cloud Shell in the Azure Portal. Add the correct Object (principal) ID in the $ObjectId variable in the script - this GUID value can be retrieved from the Identity tab on a resource with a Managed Identity of type System assigned, or from the Managed Identity Azure resource if it’s of type User assigned.
# Add the correct 'Object (principal) ID' for the Managed Identity
$ObjectId = "19a8328a-f806-4c27-a137-87a4c87d9596"

# Add the correct Graph scope to grant
$graphScope = "User.Read.All"

Connect-AzureAD
$graph = Get-AzureADServicePrincipal -Filter "AppId eq '00000003-0000-0000-c000-000000000000'"
$graphAppRole = $graph.AppRoles | ? Value -eq $graphScope
New-AzureADServiceAppRoleAssignment -Id $graphAppRole.Id -PrincipalId $ObjectId -ResourceId $graph.ObjectId -ObjectID $ObjectID
If everything went according to plan, you should see the new permission scope grant in the Powershell console.

Refer to the excellent Microsoft Graph Permission Explorer for an overview of all permission scopes available for Microsoft Graph, complete with descriptions. Also, Microsoft Docs for Microsoft Graph contains a lot of valuable information, examples and required permission scopes for the various graph requests. And, check out my blog post on Getting started with Microsoft Graph if you’re new to Microsoft Graph.
Query Microsoft Graph with a Managed Identity in a Logic App
Using a Logic App as an example, this is how to query Microsoft Graph using the Managed Identity and its granted permission scope.
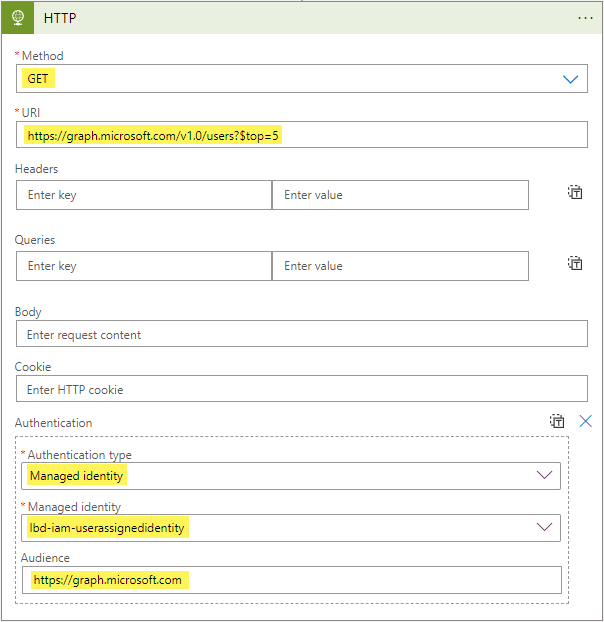
After creating the Logic App, and assigning the Managed Identity to the Logic App, in the Logic app designer blade - add a new action step of type HTTP. Configure the action step:
- Method:
GET - URI:
https://graph.microsoft.com/v1.0/users?$top=5
Then click Add new parameter in the action step, select Authentication. Set Authentication type to Managed identity, select the correct Managed Identity from the dropdown list, and add https://graph.microsoft.com as the Audience value. Save the Logic App.
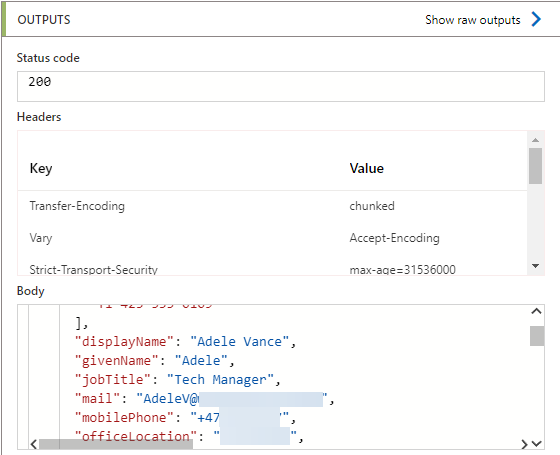
Now trigger the Logic App. If you configured everything correctly, you should see a response with HTTP status code 200 and the first 5 Azure AD users returned by Microsoft Graph.
Now you know how to use Managed Identities to work with Microsoft Graph from a Logic App.
In order to use Managed Identities with other Azure resources, see:
- Use Managed Identity with Azure Automation
- Use Managed Identity with Azure App Service and Azure Functions
- Use Managed Identity with Azure Virtual Machines
- Use Managed Identity with Azure API Management
Refer to Microsoft docs for additional guides.
And that concludes this blog post, thanks for reading!