Last week I published a blog post describing the basics of Custom Security Attributes, and how it can be utilized paired with ABAC. Now I will dive further into this topic and describe how to get a working configuration with ABAC conditions using Custom Security Attributes for Azure Blobs Storage.
Blog post contents:
- What is Azure ABAC?
- Configure Custom Security Attribute
- Configure Azure Storage blob access with ABAC conditions
- Test the configuration
What is Azure ABAC?
Azure ABAC is short for Attribute-based Access Control. This is a new feature introduced by Microsoft for Azure Blob Storage and is in public preview. ABAC brings a new flavor to access control management of Azure resources, and even though only Azure Blob Storage is supported right now ABAC will likely be introduced to a lot of other Azure resources in the future - to solve access scenarios that are complicated or hard to manage with regular Azure RBAC (short for Role-based Access Control).
In the Introducing Azure AD custom security attributes article posted in the Azure Active Directory blog on December 1, 2021, Microsoft explains that Custom Security Attributes builds on the ABAC public preview. Now you can grant users access to Azure Blob Storage with Attribute-based Access Control (ABAC) utilizing Custom Security Attributes instead of just through Role-Based Access Control (RBAC), which means fine-grained access control with fewer Azure role assignments.
So, let’s try out this public preview feature!
Configure Custom Security Attribute
We will need a Custom Security Attribute in the tenant for this purpose. See my blogpost for details on how to create such attributes, what permissions are needed to do such operations etc.
Note: Once you create an Attribute Set, it cannot be deleted from the tenant nor have its Attribute Set name changed. Always test new stuff in a demo tenant!
First I create a new Attribute Set named ProjectData by using Graph Explorer, see my blogpost on how to get started.
- Go to Graph Explorer and sign in to the tenant.
- Consent to Graph permissions
CustomSecAttributeAssignment.ReadWrite.AllandCustomSecAttributeDefinition.ReadWrite.All. -
Make a
POSTrequest to endpoint/directory/attributeSets(beta) with the propertiesid(Attribute Set name),descriptionandmaxAttributesPerSetin thebody:{ "id": "ProjectData", "description": "Set contains all security attributes for ProjectData", "maxAttributesPerSet": 25 }The Graph response will be:
 {
     "@odata.context": "https://graph.microsoft.com/beta/$metadata#directory/attributeSets/$entity",
     "description": "Set contains all security attributes for ProjectData",
     "id": "ProjectData",
     "maxAttributesPerSet": 25
 }
See the Graph documentation for attributeSet resource type on Microsoft Docs for more details.
Next, I create a Custom Security Attribute (string) named ProjectOrganization within the newly created Attribute Set.
Note: Once you create a Custom Security Attribute, it cannot be deleted from the tenant nor have its Attribute name changed. It can however be disabled if no longer in use.
- Go to Graph Explorer and sign in to the tenant.
-
Make a
POSTrequest to endpoint/directory/customSecurityAttributeDefinitions(beta) with the propertiesattributeSet(Attribute Set name),description,name(Custom Security Attribute name),status(whether the attribute is enabled or disabled),type(data type),isCollection(if attribute is multivalue),usePreDefinedValuesOnly(whether only allowing predefined values to be assigned) andisSearchable(whether attribute values are indexed) in thebody:{ "attributeSet":"ProjectData", "description":"ProjectOrganization code that the user is a member of", "isCollection":false, "isSearchable":true, "name":"ProjectOrganization", "status":"Available", "type":"String", "usePreDefinedValuesOnly": false }The Graph response will be:
 {
     "@odata.context": "https://graph.microsoft.com/beta/$metadata#directory/customSecurityAttributeDefinitions/$entity",
     "attributeSet": "ProjectData",
     "description": "ProjectOrganization code that the user is a member of",
     "id": "ProjectData_ProjectOrganization",
     "isCollection": false,
     "isSearchable": true,
     "name": "ProjectOrganization",
     "status": "Available",
     "type": "String",
     "usePreDefinedValuesOnly": false
 }
See the Graph documentation for customSecurityAttributeDefinition resource type on Microsoft Docs for more details.
And lastly, we need to assign the Custom Security Attribute with a value to a user which we will test with in the next chapter.
- Go to Graph Explorer and sign in to the tenant.
-
Make a
PATCHrequest to endpoint/users/{id|upn}(beta) with the correct useridoruserPrincipalName. Add the properties in thebodyas shown below,ProjectDatais the Attribute Set name andProjectOrganizationis the Custom Security Attribute name, whiledpt-23184is the Attribute value:{ "customSecurityAttributes": { "ProjectData": { "@odata.type": "#Microsoft.DirectoryServices.CustomSecurityAttributeValue", "ProjectOrganization": "dpt-23184" } } }The Graph response will be:
HTTP/1.1 204 No Content
To verify the assigned Custom Security Attributes on the user, make a GET request to endpoint /users/{id|upn}?$select=id,userPrincipalName,customSecurityAttributes (beta) with the correct user id or userPrincipalName. The Graph response will be:
{
    "@odata.context": "https://graph.microsoft.com/beta/$metadata#users(id,userPrincipalName,customSecurityAttributes)/$entity",
    "id": "26406275-67f9-47fe-a80b-f71b18865cf2",
    "userPrincipalName": "[email protected]",
    "customSecurityAttributes": {
        "ProjectData": {
            "@odata.type": "#microsoft.graph.customSecurityAttributeValue",
            "ProjectOrganization": "dpt-23184"
        }
    }
}
This example was for assigning a string Attribute. See the Graph documentation for assigning, updating or removing Custom Security Attributes on Microsoft Docs for other data types and additional information.
Configure Azure Storage blob access with ABAC conditions
The prerequisites are in place and I can go ahead and create a new Azure Storage Account to play around with, and set up RBAC and ABAC.
- Go to the Azure Portal and create a new Storage Account.
- Once deployed, visit the Access Control (IAM) blade on the Storage Account, go to the Role assignments tab.
-
Click + Add -> Add role assignment, on the Members tab select
Readerand click Next, specify the user that was given the Custom Security Attribute earlier, and click Review + assign.Note: The
ReaderRBAC role is only granted to the user so they will be able to actually see the Storage Account in the Azure Portal. This role does not grant any access to the data within the Storage Account. - Then click + Add -> Add role assignment again, on the Members tab select
Storage Blob Data Readerand click Next, specify the user that was given the Custom Security Attribute earlier (or a group that the user is a member of), click Next. -
On the
Conditionstab, click + Add condition and use the visual editor to configure conditions as displayed below: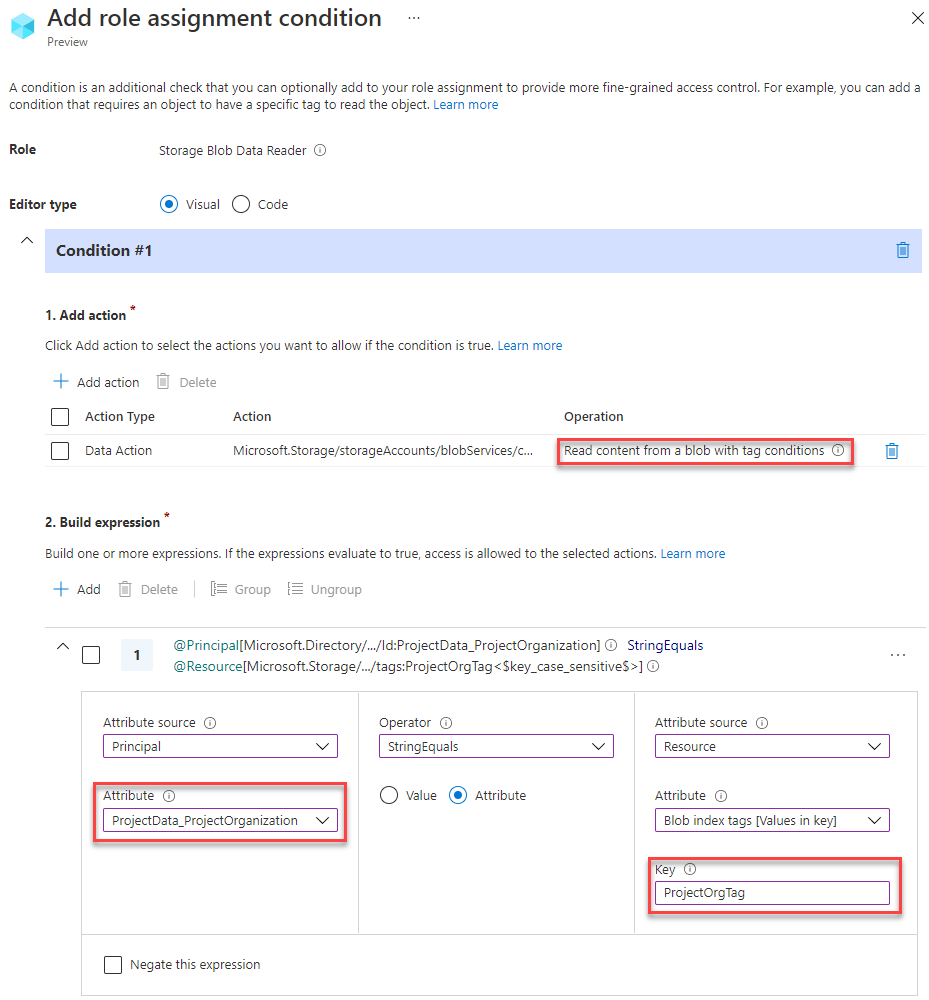
If you prefer to use code editor instead, use:
( ( !(ActionMatches{'Microsoft.Storage/storageAccounts/blobServices/containers/blobs/read'} AND SubOperationMatches{'Blob.Read.WithTagConditions'}) ) OR ( @Principal[Microsoft.Directory/CustomSecurityAttributes/Id:ProjectData_ProjectOrganization] StringEquals @Resource[Microsoft.Storage/storageAccounts/blobServices/containers/blobs/tags:ProjectOrgTag<$key_case_sensitive$>] ) ) - Click Review + assign to save the new role assignment with conditions.
I have now configured an Azure RBAC role assignment with ABAC conditions for Storage Blob index tags. There are other ways to configure ABAC, e.g. matching name on containers within the Storage Account - visit Microsoft Docs for more examples on how to configure ABAC.
Test the configuration
In order to test the configuration I first need to upload some blobs with index tags in a container within the Storage Account. I have prepared 3 text files with random content on my local machine.
- Go to the Storage Account created earlier in the Azure Portal, visit the Containers blade.
- Create a new private container, then open it.
-
Click Upload, select the first file and click Advanced - make sure to add the correct
Blob index tag keyandvalue.Note: The
keyvalue is the same key as configured in the ABAC conditions (step 5), whilevalueis the same value as set in the Custom Security Attribute on the user.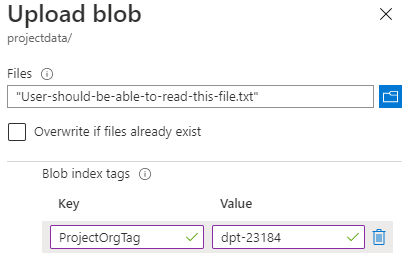
-
Then upload the two other files - but this time set no value or some other Blob index tag value, meaning that the user should not be able to read these blobs.
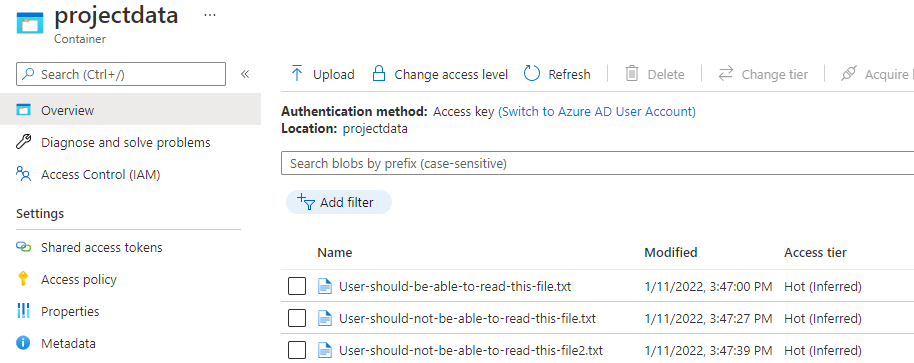
Now it’s time to log in to the Azure Portal with the test user to verify that ABAC conditions actually works.
- Log in to the Azure Portal as the test user that was given the Customer Security Attribute earlier.
- Go to the Storage Account, then Containers blade and click on the container. Make sure that Authentication method is set to
Azure AD User Account.
The user should now see the 3 blobs that were uploaded. However, the user should only be able to click and read the contents of the blob that has the same Blob index tag value as the user’s Custom Security Attribute value, as the Storage Blob Data Reader role assignment with ABAC conditions is only valid for blobs where the index tag matches. When the user tries to click and read the other two blobs it will result in a No Access error:
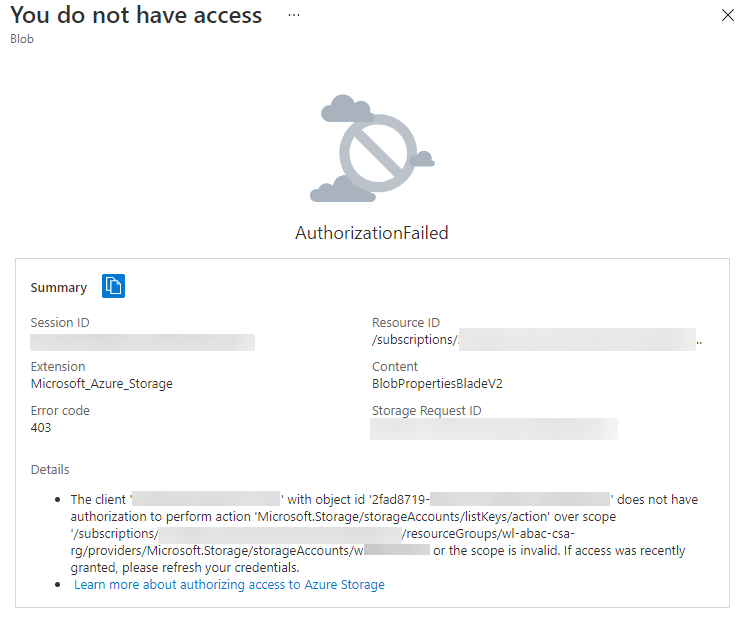
Pretty cool! This means I can have thousands of blobs within one or more Storage Accounts, and by granting exactly one RBAC role assignment with ABAC conditions I can control which blobs users can access based on a value tagged in their Custom Security Attributes. This is just one scenario showcasing Azure ABAC conditions using blob index tags. As mentioned earlier, there are other ways to configure ABAC conditions, both with and without using Custom Security Attributes - visit Microsoft Docs for more examples on how to configure ABAC.
I believe and hope that we will see a lot more support for ABAC and Custom Security Attributes built into Azure and Azure AD services in the near future. Stay tuned!
And that concludes this blogpost, thanks for reading!